Saturday, November 6, 2010

Santa's Workshop

Well, something happens this time of year...my office becomes a sweatshop. Every January I think that I'll get these gifts done throughout the year. Uh...nope. The procrastinator in me would just not like that. So when I realized that I had to get all of my gifts done by Wednesday...yeah I finally decided to get to work. 1 family done...1 more family to go.

And it isn't actually that I haven't been sewing. I just haven't been blogging...or sewing for Christmas! But here are a few things I've been working on these last few days...

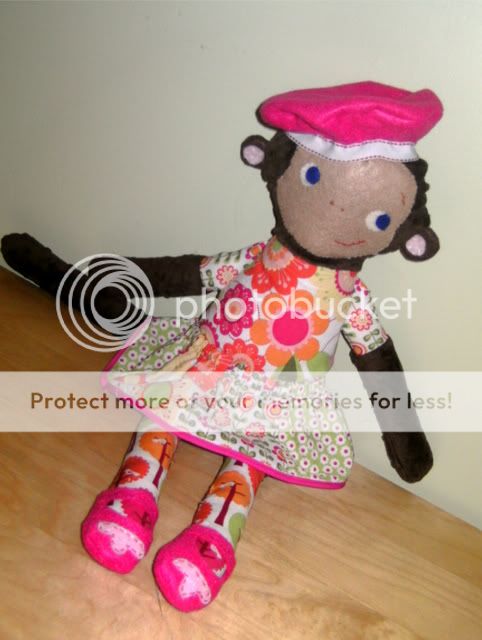
This is Molly. Isn't she cute...my girls sure think so. I keep having to hide her because they Looooove this soft little monkey!
Photobucket

Some kimono style jammy/lounge outfit. I used Amy Butler's pattern from her "Little Stitches" book. At least the top.
Photobucket

Confession: These were the first pants I made. I haven't had a baby for a while...but they just looked like they might not be that comfortable. I guess I need a little practice putting pants together!
Photobucket

Sunday, May 23, 2010

Coconut Lime Cupcakes

Coconut Key Lime Cupcakes with
White Chocolate Frosting

I'm in quite the cupcake craze right now. I went to The Cocoa Bean Cupcake Cafe in Provo {go check it out...so yummy!} and tried their coconut lime cupcake and it was soooo good! Well, now I make them at home with this yummy recipe!!

Photobucket

{a few notes about this recipe}

I've made a few changes that turned out yummy. These don't have a super strong key lime flavor...so if you want them to pack a punch...add a little more zest and lime juice {just subtract some of the coconut milk}

They say to bake them for 25 minutes...but 20 minutes was perfect for regular size cupcakes.

I added coconut milk in place of some of the butter milk.

I made candied limes using THIS recipe to garnish.

Ingredients

* 3/4 cup (1 1/2 sticks) unsalted butter, at room temperature
* 1 cup granulated sugar
* 2 eggs, at room temperature
* 1 teaspoon pure vanilla extract
* 1 heaping teaspoon grated key lime zest
* 1 1/2 tablespoons key lime juice (bottled or freshly squeezed)
* 1 1/2 cups all-purpose flour
* 1/2 teaspoon baking powder
* 1/4 teaspoon baking soda
* 1/4 teaspoon kosher salt
* 1/2 cup buttermilk {I used 1/4 cup lite coconut milk and 1/4 cup buttermilk}
* 1 1/3 cups loosely packed sweetened coconut flakes (3.5 ounces)

For the Frosting:

* 5 ounces good quality white chocolate, chopped into small chucks
* 1/2 cup (1 stick) unsalted butter, room temperature
* 3 1/2 cups powdered sugar, sifted
* Pinch salt
* 1/2 teaspoon pure vanilla extract
* 1 tablespoon key lime juice (bottled or freshly squeezed)
* 1/4 cup sour cream
* Finely grated key lime zest, for garnish

Directions

Preheat oven to 325 degrees F.

In the bowl of an electric mixer fitted with the paddle attachment, cream the butter and sugar on high speed until light and fluffy, about 5 minutes. With the mixer on low speed, add the eggs, 1 at a time, scraping down the bowl after each addition. Add the vanilla extract, key lime zest and juice and mix well. In a separate bowl, sift together the flour, baking powder, baking soda, and salt. In 5 parts total, alternately add the dry ingredients and the buttermilk to the batter, beginning and ending with the dry. Mix until just combined. Fold the coconut into the cupcake batter.

Line a muffin pan with paper liners and fill each liner almost to the top with batter. A spring loaded 1/4 cup ice cream scoop works great for this and ensures the cupcakes are all the same size. Bake for 25 minutes or until the tops begin to brown and a toothpick comes out clean. Remove cupcakes from oven and allow to cool in the pan for 10 minutes and then transfer cupcakes to a baking rack to cool completely.

While the cupcakes are cooling you can make the frosting. In a small heat proof bowl set over a pot of simmering water, carefully and slowly melt the white chocolate. Remove from heat and let cool until just slightly warm. Meanwhile, in the bowl of an electric mixer fitted with the paddle attachment, beat the butter until light and fluffy. With the mixer on low, gradually add the powdered sugar until well combined. Add the salt, vanilla extract, key lime juice, and sour cream and mix until very smooth. Add the melted white chocolate and mix just until incorporated.

Frost the cupcakes and garnish with a bit of grated key lime zest. Enjoy!

Friday, May 7, 2010

Chalk Cloth Tutorial

There are so many fun things you can do with Chalk Cloth! I got home from grocery shopping tonight and decided to make a menu board out of my chalk cloth. No more food going to waste because I forgot what I was going to make with it! Here is a quick tutorial!

I got this frame at DI for $.50. The glass broke before I could do anything with it...which is perfect because I don't need it anyway! Toss out and glass and take out whatever is in the frame.
Photobucket

Take the mat out of the frame. Cut out your chalk cloth about 1" bigger on all sides. Mine is less than that because I already had a piece cut out for a different project...and it worked fine...but I think you will burn your fingers less if you do about an inch!
Photobucket

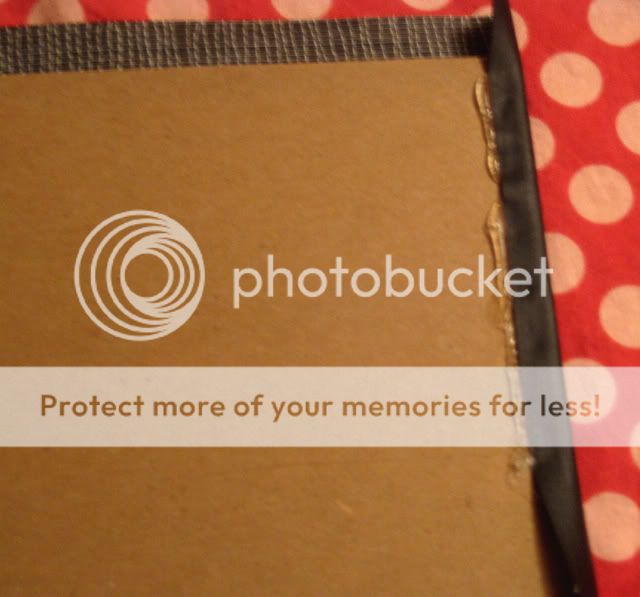
Use a hot glue gun to glue all the edges to the mat. Pull tight and glue a few inches at a time for a smooth finish.
Photobucket
Turn your mat over and take a the long side of the chalk and write all over your board. This primes your chalk cloth. Use a damp cloth to wipe off all of the chalk and let it dry.
Photobucket

Put your chalk board back in your frame and write out your menu! Now you'll never have to wonder
"What's for Dinner?"
!
Photobucket

If you are wondering where to get chalk cloth. They sell lots of it on Etsy. Or if you are in Utah...just come to my house. I bought quite a few yards of it wholesale and I don't think I'll be using it all!

One more tip...you can iron it! I had some pieces that got quite wrinkly and I was able to iron it on the lowest setting.

Photobucket

Wednesday, May 5, 2010

Lil Mod Dress

A little dress for my sweet little niece Regan. I am working on getting gifts to all of my family members...but lets face it...I have a lot of family members!!

Photobucket

This dress would have come together so quickly if not for this rounded neckline. I spent so much time trying to make it round and perfect. It isn't perfect...but it's pretty good.
Photobucket

Tuesday, May 4, 2010

Mother's Day Tutorial....sort of!

Picnic-Tastic Lunch Mats

Finished the rest of the Leong Mothers Day gifts! Two more sets of picnic place mats using Sandi Henderson (old skool) fabric! I made these double sided.

Photobucket

Wanna make these! So easy!

Cut out place mat 22" wide by 16" tall (cut 4)
Cut pocket 7" wide x 4" tall (cut 4)
Cut napkin holder 2" wide x 4" tall (cut 4)
Photobucket

To make the place mats, fold the fabric over (right sides together). Your fabric should measure 16" wide x 11" tall. Sew together leaving an opening for turning. Turn mat right side out and use a chopstick to push out the edges. IRON, IRON and IRON some more. I used starch and the chopstick to make nice, crisp edges.

Top stitch around all four sides of the mat (this will close up the hole).
Photobucket

For the pocket, take the top edge...fold it down 1/4 inch...then another 1/4 inch. Press and top stitch. For the flatware holder take your 2x4" fabric. Fold it in half. Open again and fold both sides into the middle..then fold again. Iron and top stitch on both sides.

Put your flatware holder on top of the pocket piece and baste in place. Then take the three raw edges (with the newly attached flatware holder) and fold back 1/2 inch and iron (on the backside). Top stitch pocket to place mat. (does this part make any sense at all)?

And you have some fun place mats....so go on a picnic and enjoy!!
Photobucket

I have the cutest little helpers!!
Photobucket

Well, those were really not the best instructions...not really a tutorial, but it isn't my original work so I just wanted to pass the info along (mostly for Darcy!) Hope it wasn't too confusing!

Monday, May 3, 2010

Mother's Day Preview

I'm not always the best at getting gifts out to family...but I really want to honor all of the mothers in my family!

About 2 summers ago, Robert's family started picnic in the park. It has become a little tradition. Everyone cooks something yummy and meets at the Chardonnay Hills park. So I decided to make a set of picnic place mats for Robert's sisters and mom. No more eating on those yucky picnic tables!! Here is a set that I made for one of his sisters. I still have two left to make...but I'm getting there!

Photobucket

I love this Tina Givens fabric. I wish I had some of the coordinates..but since I don't this was a perfect project!
Photobucket

The best part of the place mats...a cute little pocket to keep your napkin from flying away and a little spot for your flatware.
Photobucket

Tutorial was from "One Yard Wonders". So many fun ideas in that book!

Saturday, May 1, 2010

Mix n Match

I love how these outfits finally came out.

I started with the Madealine Apron Knot Dress found HERE.
Cute...but I think it loses something when you put a store bought top underneath!
Photobucket

So I added a peasant top and ruffle pants to complete the look.
Photobucket

Here is one of the outfits without the knot dress
Photobucket

Side view...I just love these cuddly girls!
I used this tutorial for the birthday crowns.
Photobucket

The fabric I used was from Patty Young's Flora & Fauna Collection. I just love the bright colors!
Photobucket

ps. I HEART my serger! Rolled hems make sewing so much faster!

LinkWithin

Blog Widget by LinkWithin